1950s fashion, sewing, sewing patterns, vintage clothing, vintage fashion

Something is Afoot

Some of you have followed my foibles in sewing. I suppose it’s a bit funny to watch someone who’s sold sewing patterns for twenty plus years actually learn how to use them. Even I think it’s rather funny that I love seeing patterns so much, yet have such limited sewing skills. So here we go again.

Simplicity 3388

I decided to make my mom a flannel nightgown for Christmas. She’s always cold and loves curling up in flannel, especially since her electric blanket isn’t working. I chose Simplicity 3388, because it’s marked easy (a lie) and it’s pretty (truth). I got the flannel from FABRIC.com, because I absolutely hate Joann’s website, and still can’t go into stores because yeah, pandemic. It’s a super soft flannel called Comfy Flannel Micro Dot, and it’s really pretty. They also have a similar one with stars, and that one’s on sale right now. I’d definitely use this fabric again.

First disaster: I didn’t order enough fabric. I’m not sure how that happened. Maybe I read the requirement for the shorter style, I’m not sure. I realized when I laid it all out that I’d need more, so I went ahead and cut what I had while I was waiting for more to come. No worries, I have plans for the extra, so it won’t go to waste.

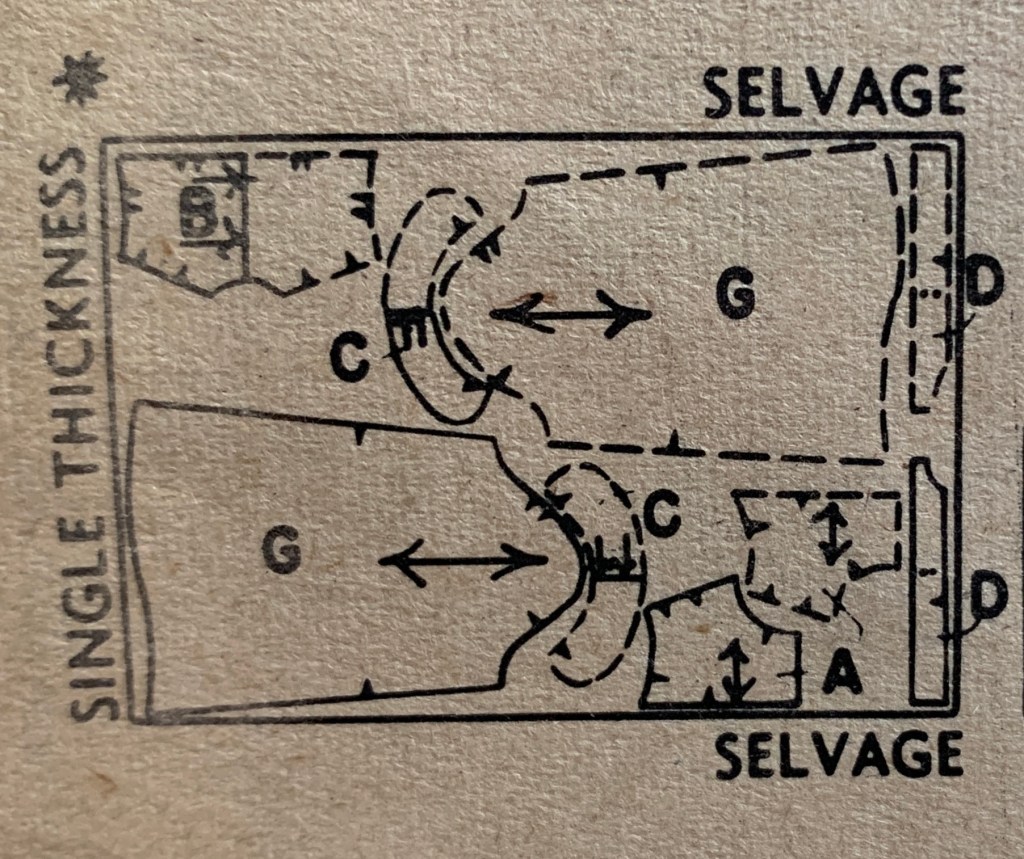
The bodice went together ok. I even felt rather smug that it was going well. The big detour I had to take was when the instructions talked about collar facings, and I had none. I spoke with my favorite handy dandy Facebook group and found that in 1950, the my didn’t make separate facings—you just cut two of whatever you needed. One piece was the actual piece, while the other was the facing. Then I was informed that I’d cut the collar wrong. Apparently when they wanted you to cut something on the fold but it wouldn’t fit along the fold, they made dotted lines on the cutting chart, and you were supposed to flip the piece and cut it as one. See below:

The ones with dotted lines mean “flip that piece over and cut it again, so you have two pieces.”

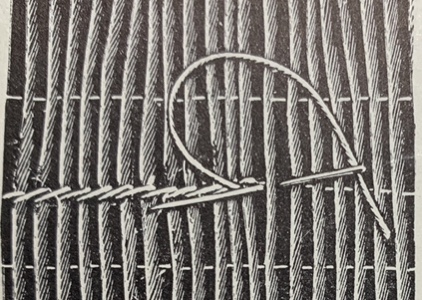
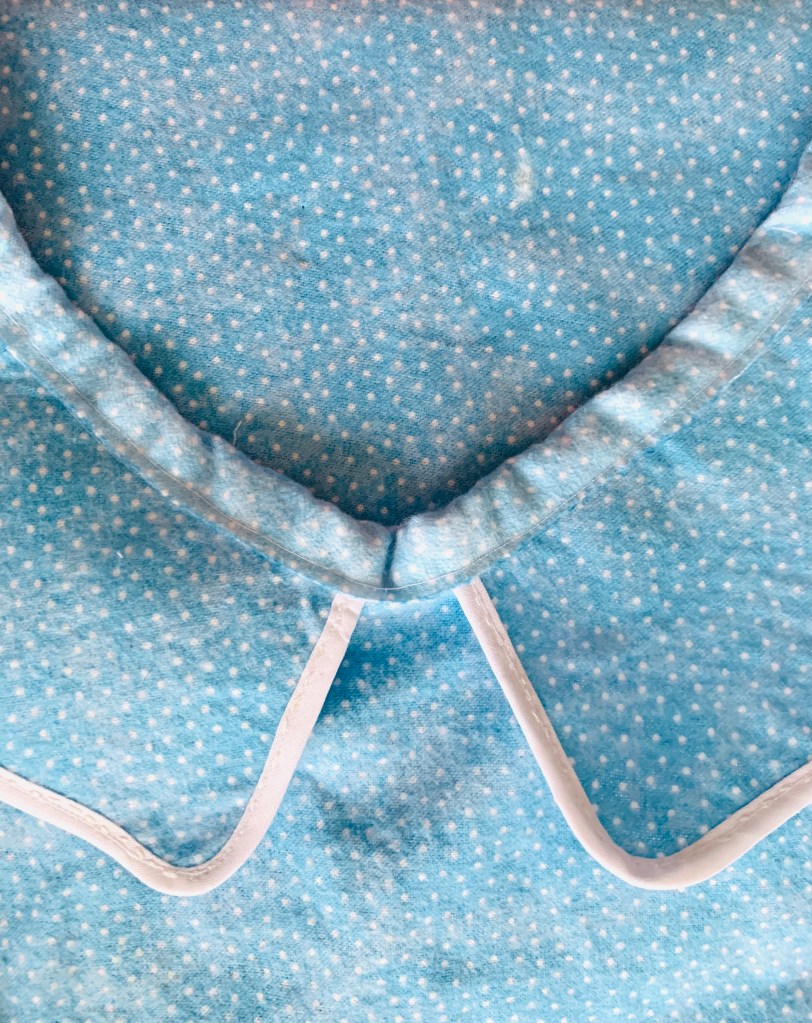
So I realized that I had cut the collar wrong. No biggie. I decided to make the Peter Pan collar as two pieces instead of one long continuous piece. I think it may have made it a bit easier. At this point, I realized that in this time period they had you make your own bias tape, which is a thing of the devil, so I pulled out some white bias tape and went to work. Because of my shortage of fabric and the cutting faux pas, I did without the facings and used interfacing as the under collar. It all came together ok.

I’m not sure why this pattern has a button and a ribbon tie at the neckline. It seems a bit much, and since I’ve never done a buttonhole yet (rookie), I just left the bodice open, and will add a ribbon if Mom wants it. Also, note that the ribbons shown on the sleeves are run through a casing, and there’s no elastic. They also are located further up the arm, to create a kind of flounced cuff. I thought the ribbon might be annoying, given the propensity for things to slip through a casing (yes, I could’ve anchored it, I suppose) so I just added elastic instead. The bodice ruffle is a bit wonky, but I’m going to add a ribbon there, I think, to help cover it.

It didn’t come out perfect, though I do feel kind of proud that I got the sleeves set in on the first try. I’ve never done anything with sleeves yet, so I expected trouble, and got none. All I have left to do is the hem, and although it’s not perfect, Mom won’t care, because it’s warm and it’s pretty. Here’s a quick picture of the finished gown:

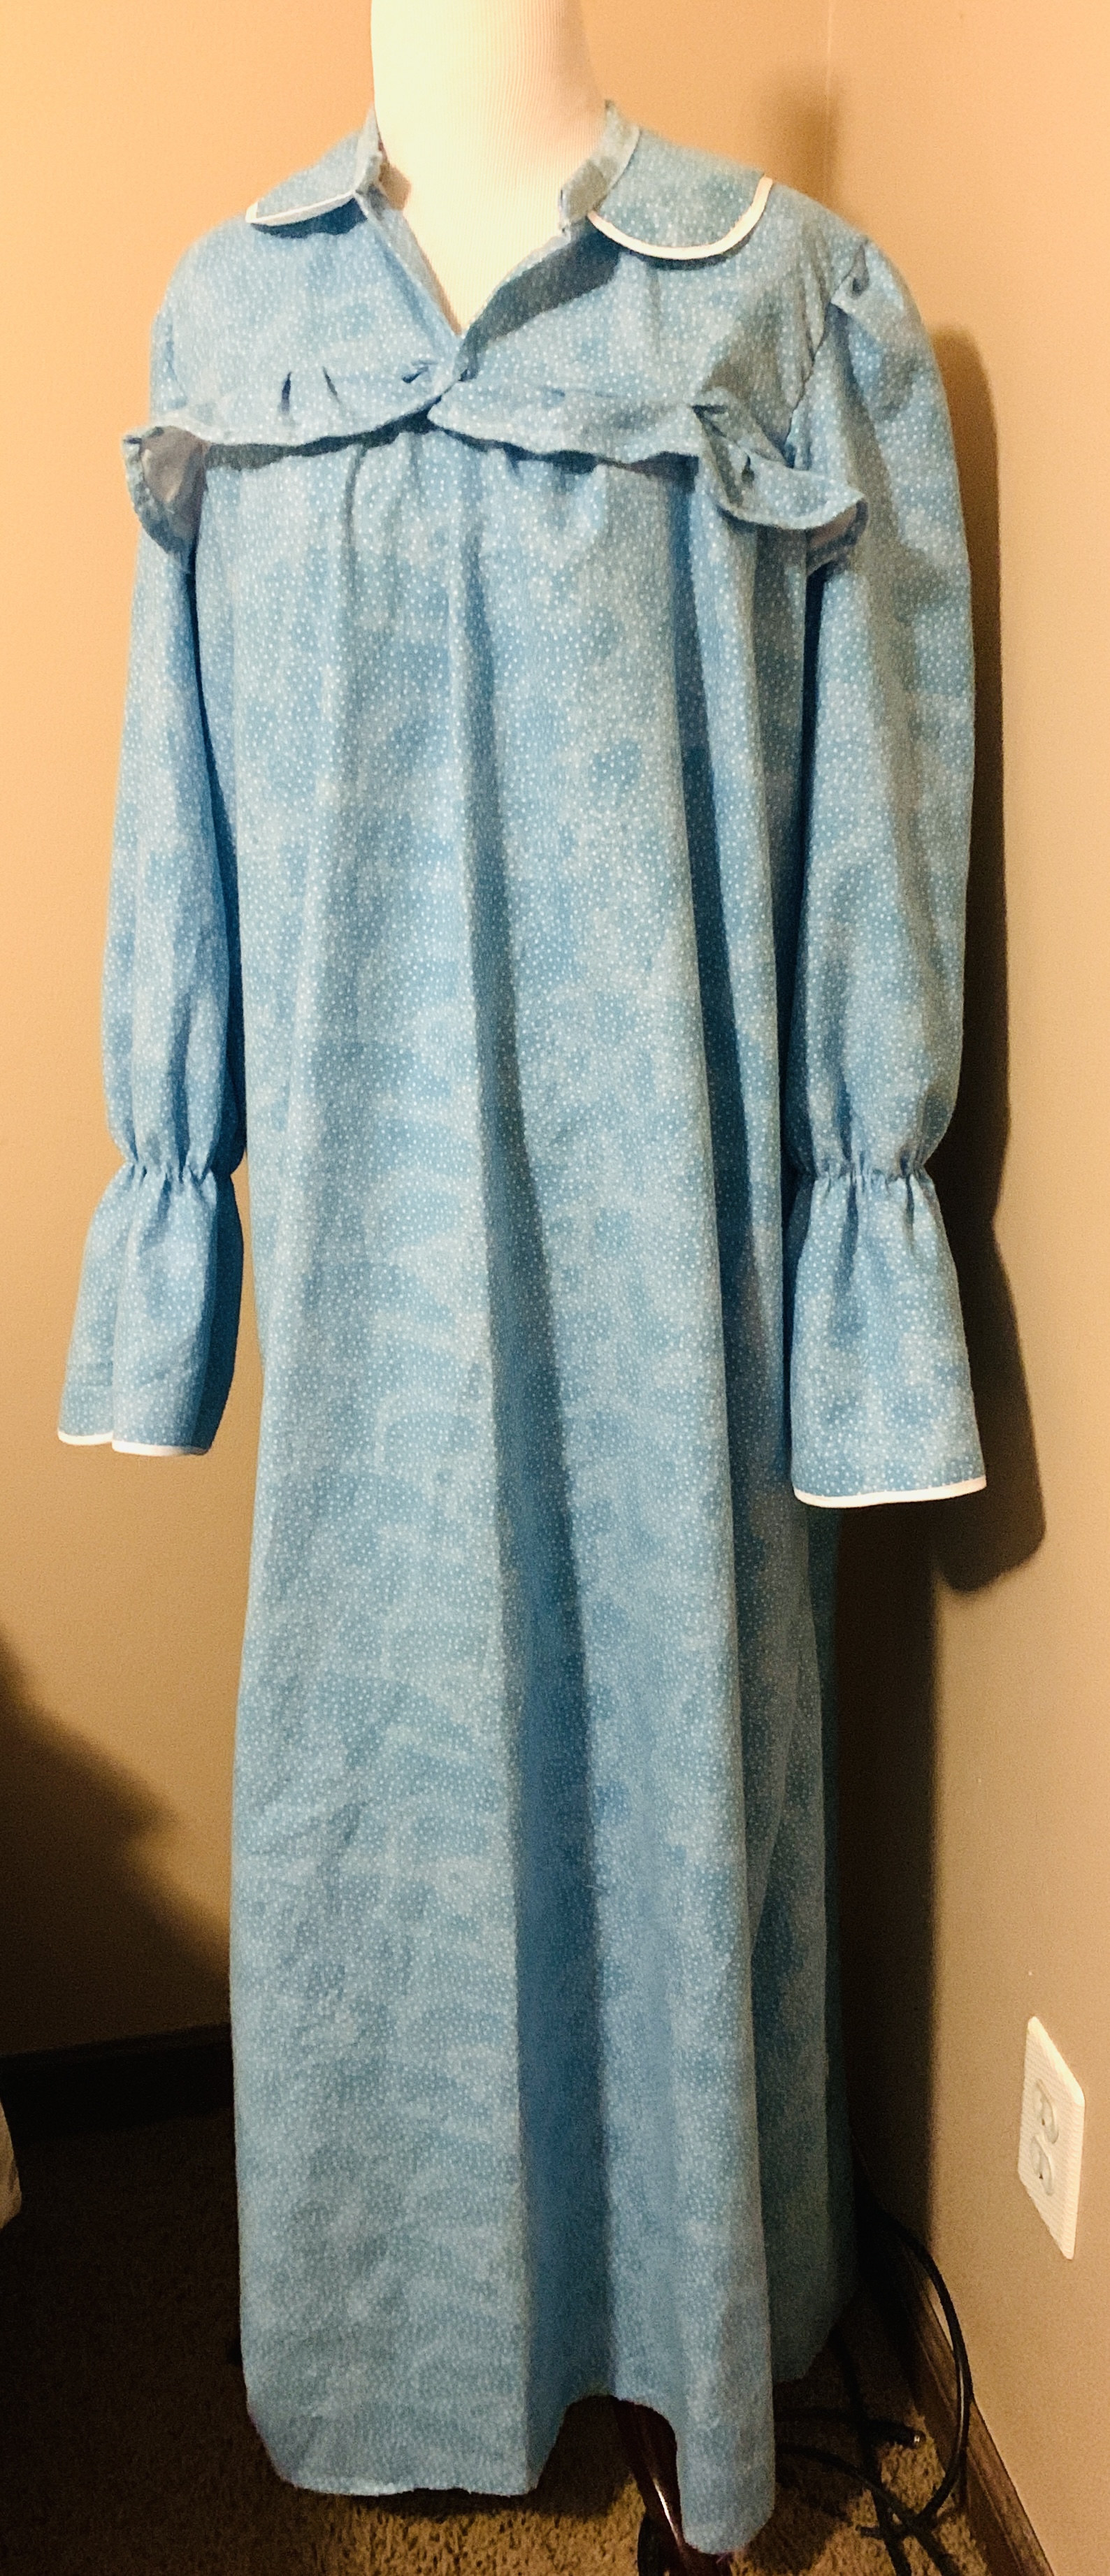
The only other thing I will say about this pattern is that the skirt is very full. Like, when I held it up to show hubby, he thought it was way to big for my tiny mom. It actually looks like the skirt is way too big, but the bodice fits my bust 34 dress form perfectly. I think it’s just designed to be really full. And if you are making this for someone elderly, that can be a worry, because the elderly have problems sometimes with getting caught up in their bed linens and falling — it happened to my dad a couple of times. I’m a bit worried about that with Mom, but she’s still pretty spry, so we’ll see. I hope my sewing doesn’t kill her. Seriously.

But it turned out pretty and I’m happy, and I think Mom will like it. I still have to hem it before Christmas. If you love the pattern and want to try it, you can get it from my shop by clicking here for bust 34 and here for bust 42.

sewing, sewing patterns, Uncategorized, vintage clothing, vintage fashion

Lookie, Lookie!

Butterick 3205, from 1890.

I was looking through this amazing Butterick monthly catalog from 1890, and came across this gorgeous wrap on the right. I have no idea how it works, but I’m in love with the idea of it. Is it a coat? A cape? A cape-coat? Where do your arms go? What does the front look like?

I. Have. No. Idea. But it was love at first sight, and I’d make it in blood red velvet or even green, and I’d probably never take it off. What do you think?

self help

‘Splain This To Me, Lucy

<iframe src="https://giphy.com/embed/xT0xeEQDvWVO5v3Ukg" width="480" height="267" frameBorder="0" class="giphy-embed" allowFullScreen></iframe><p><a href="https://giphy.com/gifs/foofighters-foo-fighters-doa-xT0xeEQDvWVO5v3Ukg">via GIPHY</a></p>

I love to read old etiquette books, and have quite a collection of them. It’s fun to see how manners have changed over the years, and it’s good to have a reminder of how grandma would have expected for me to behave, given I’m just shy of a caveman in comparison.

I was listing a 1940s etiquette book in the shop today, after quizzing my husband on the customs of 1940 last night. He actually did surprisingly well, though I shouldn’t be surprised. As irreverent as he is most days (he’s a Marine, after all, so he says it how he sees it), he was trained in the 1950s by his brother, who was in a fraternity at Miami University. His brother was very proper, and drilled it into my husband. Hubby also got some training on protocol in the Marines, especially since he was an officer, and there were expectations. I have a vintage book about how to be a good officer’s wife, but I’d fail from the get-go since I don’t cook.

So when I came across this piece in a 1929 Vogue etiquette book, I was confused. You tell me what this means:

“The sight of bones being picked and the appearance of fingers and faces afterward to not linger agreeably in the memory….The only way to meet the ordeal of removing fish and terrapin bones from the mouth is to meet it frankly and firmly. If the bone can be brought to the edge of the lips, it can be pulled out quietly between the finger and thumb. If it dludes the pursuit of the tongue, there’s nothing to be done but choke or hunt for it. The elegant who object to choking are sometimes driven to the cover of the held-up napkin while they hunt. This is one degree worse than hunting in the open, and it is therefor suggested that any beast bristling with bones be chewed cautiously and in the front of the mouth.”

Vogue’s Book of Etiquette, 1929, p. 197.

Are they suggesting that you choke on a fish bone rather than removing it? Have they never heard of how Christian Dior died (true, he died 25 years after this book, but still…). Am I reading this wrong? I have so many questions.

Tell me what you think.

Note: I may receive a small amount of compensation for purchases from affiliate links.

genealogy, sewing, sewing patterns, vintage clothing, vintage fashion

Connections

Pictorial Review 2712, 1927

I love genealogy. I love to see how we connect to our past, and all the stories connected to it. This pattern is one example. It’s Pictorial Review 2712, and it’s from around 1927.

My grandmother worked for Pictorial Review in the 1920s. She was a fashion editor, and was something of a Manhattan socialite, having come from a family who came over on the Mayflower, then settled in New York. She went on to marry my grandfather, a West Point graduate, and to give birth to my dad and uncle. Grandma was born Helen, but changed her name to Helene because she thought it was more romantic. She continued to write under pseudonyms, including Camilla Kent — ironic, given the fact that the former Camilla Parker-Bowles is now the Dutchess of Kent. She did a lot in her life, and lived to be 95. I wish I could talk to her now and hear her stories.

So Pictorial Review patterns have meaning for me, especially the 1920s ones, because maybe she had her hand in choosing them for the magazine. This one, being from 1927, has special meaning, because that’s the year my dad was born. I imagine her wearing the 1920s styles Pictorial Review put out, and even though this one is a girls’ pattern, it might have fit Grandma because she was TINY.

Grandma went on to author a book with my grandfather, after collecting antique dolls and dollhouses for years. Grandpa wrote his autobiography, as did his dad, and then my dad. The stories are there. I hope that my kids appreciate them one day as much as I do.

Click here to purchase this pattern in my shop.

sewing

My Fascination With Edwardian Smocking

Smocking has always fascinated me. I’ve done a fair share of needlework over the course of time, but I’ve never tried smocking. The detailed work of it all intimidates me, and I think it probably takes a special kind of patience to do it. I look at Edwardian smocking and think “how in the world did they do that?”, but people back then had needle skills that we don’t usually have ingrained in us anymore. Pity.

I came across this article in a 1915 Home Needlework Magazine and thought I’d share it. It’s all about the details of the different stitches, and how to do them. At this point, printed smocking patterns were just becoming available, so it talks about how to place the dots that serve as a guide. Originally they used cardboard and penciled every dot individually, always on the wrong side of the fabric. Can you imagine the time it took? They also had to have absolute accuracy as they moved the cardboard across to repeat the pattern the width of a garment. The preprinted smocking transfers made this much easier.

The next step was to do the gathering. One had to be sure to anchor the first stitch with a double stitch so that it didn’t all come apart as the thread was pulled to create the gathers. Nothing would be worse than to do the pulling and watch it all come apart as the knot pulled through, and you had to start all over. A thread would be run through each dot, pulling up a tiny bit of fabric with each stitch. The thread would be drawn up and knotted, creating all the gathers. The general rule was to use fabric four times the length of the smocked area, so if you needed to smock an area of 12 inches, you would use 48 inches of fabric. Who says sewing doesn’t teach math?

Stitches used are as follows:

Outline stitching. This one is used to begin the smocking pattern, and is the basis from which most smocking begins. You would work the stitch from left to right, using the gathering thread that you’ve already done as a guide to keep the work straight. Start the thread on the second plait on the wrong side, and bring the needle up on the first plait on the right side. One stitch is taken every other plait. You can keep the thread either above or below the needle, however you wish. Every stitch needs to be exactly on top of the gathering thread all along the line, or it will look crooke.

Cable stitch

Cable stitch. Start the same as with outline stitch, taking one stitch in each plait, keeping the thread above the needle in the first stitch and below the needle in the next. Work it this way all the way across, again being sure to stay right on top of the gathering thread.

Double cable stitch

Double cable stitch is two rows of single cable, just worked very closely together.

Can you imagine doing this in the lighting available in 1915, and without benefit of the quality eye care that we have now? My eyes would hurt!

Vandyke stitch

Vandyke stitch is one of the most important stitches. It is used in making points. The number of dots required for making points always needs to be divisible by four (again, math). Vandyke stitch is worked from right to left. The thread is started in outline, then take two plaits together and one stitch over, then come down to the second gathering thread, taking the second and third plaits together, one stitch over then up again, taking the third and fourth plaits together, another stitch over, and repeat to the end of the line.

Wave stitch is started on the first plait on the second gathering thread. Work four stitches gradually up, one in each plait with thread below the needle, making the fourth stitch on the first gathering thread, then work four stitches down with the thread above the needle, the fourth stitch up and the first stitch down, in order to make the stitches level. The following rows are worked in the same way, just beneath the first. Stitches with wave stitch may extend between two or mother gatherings.

Double wave stitch is made in the same way, working in the opposite direction.

Cross stitch

Featherstitching and cross stitching are “simple” fancy stitches used a lot. The author of the article surmises that you can figure them out by looking at the diagrams. You see a lot of the cross stitch patterns in chicken scratch patterns, so popular for aprons and home decor today.

All in all, I think I could probably figure out how to do it, but can you imagine the time involved here? Think of 1915, when there were no automatic washers or dryers, microwaves or conveniences like we have today. When did women get time to do this? This was my grandmother’s time period, but she was rather wealthy so her parents probably went to a dressmaker for her things. I think that it’s likely that for most women these would be considered special garments and not for every day use, or would be children’s Sunday best. I’m glad that so many have survived though, because they are just lovely, and by what I can tell, the art continues, because smocking patterns generally fly out of my shop as soon as I list them.

Do you do smocking? I’d love to see your work if you do.

sewing, sewing patterns

Cool Christmas Gifts for the Sewist / Fashion Lover

Every year my mom asks what I want for Christmas. She seems to think I’m hard to buy for, despite the fact that I tell her to get what she’s gotten me the past several years: a good coffee table fashion book. Of course, I like weird things like sewing patterns that she’d never know how to buy, but you can’t go wrong with a good book, right?

So here is a list of things that I like, and maybe you will. Some fashion, some not, but tell me what you think, or maybe buy one or two (I may get a small fee for some that are affiliate links):

  • Christian Dior, Designer of Dreams. I have this book and it’s just lovely. Quality binding, gorgeous photos and the text is top notch too. Great for any vinage fashion lover.
  • The Bombshell Manual of Style. I love books that tell how to dress or act. Etiquette books are among my top favorites, but ones like this that tell you how to depict a character are great fun. This one tells you everything from makeup to wardrobe to perfume, with references as to where the ideas came from. Everything you need to get in touch with your inner Jane Mansfield.
  • Vogue UK . Don’t mess with American Vogue. It’s trash, and Anna Wintour needs to retire (I feel a rant coming on). Edward Enniful has done some glorious things with British Vogue. This one is the Kindle edition, but you really need to see it. It’s incomparable to American Vogue (which sucks).
  • Alexander McQueen Savage Beauty. This one has been on my list forever, and somehow no one gets it for me. I think maybe my mom is scared by the holographic cover, which switches from Alexander McQueen’s face to a skull (sadly prophetic, yes?). Alexander McQueen was a modern genius who left us too soon, and I’d love to have this one in my collection. And if you haven’t seen the Amazon Prime documentary about him, why not? It’s SO good.
  • I want one of these so much.
  • You should get this and this for the sewing pattern enthusiast in your life. Books on sewing patterns are few and far between, so if your person doesn’t have these, get them. They’re wonderful.
  • Evelyn Wood is my favorite sewing You-Tuber. She breaks down things so even I understand them, and she’s adorable. Get your person a subscription to her Vintage Sewing School and it’ll give them fun all year long, even during quarantine.
  • If your person wants to learn how to sew or is just learning, they need the Vogue Sewing Book. Spend the money to get this first edition or find a used copy, but this is the all-encompassing sewing book that they need. Don’t worry about the age — trust me on this. It’s the perfect resource for sewing helps.
sewing

The Ad Guys Were Working Overtime on This

I listed this cool 40s zipper repair kit in the shop the other day. It is made by Freed’m Slide Fastener Corporation, and is a replacement zipper pull kit. The advertising they packed into this baby is amazing.

For your consideration, I give you the following hyperbolic advertising:

  1. “Miracle adjustable zipper closure.”
  2. It insures against future zipper trouble. (Yes, the use of insure vs. ensure makes me twitchy too, but I think the use has changed since the forties, so I’ll give it to them.)
  3. “Freed’m Frees ‘Em.”
  4. The “Jaws of Freed’m”
  5. The Five Freedoms: freedom from catching, freedom from snagging, freedom from jamming, freedom from slipping, and freedom from failing. Interestingly, this may be a little play on Norman Rockwell’s Four Freedoms series, painted in 1943.
  6. The “Magic Dial”

There’s no question that the ad guys earned their keep here, what with this all jammed into one little foldout. Add the bright red and green background and bingo! I hope they made a lot of money.

Now listed in the shop.

sewing patterns

A Mini-Rant Wrapped Up In An Informative Post

I may have mentioned some time back that I’ve sold online for years. I started out when eBay was text only — no pictures — so I’ve been around the block a time or two. I started out buying homeschool books, then started selling them, and it morphed from there. I started selling sewing patterns around 1999 or so, and have been hard at it ever since. I love what I do. I’ve been on eBay, another online mall (that now appears to be a porn site – WOW), my own website, and have been happily settled on Etsy for several years. I go back and forth about going back to my own website, but haven’t decided, so there I stay.

Once in a while, I get a message from someone on Etsy, asking if I will take (insert number) dollars for the pattern(s) they want to purchase. My standard response, thanks to one of my friends’ brilliance is “I’m sorry, but I post my best price.” Because I do. I’m not running a garage sale. This is my primary income. I take pride in what I do, and it’s WORK. Let me tell you how it works when one is selling patterns.

First, you have to find the patterns. I’ve been blessed. I’ve been featured in the Indianapolis Star, as well as Threads Magazine. I don’t have a shortage of people contacting me to buy patterns from them. I have to set up a time to look at them, and then travel to the location. I have to look through them and decide if they are something I really need, because patterns accumulate rather quickly. I’m choosy. Then I take them home and the work begins.

I have to count each pattern, making sure that not only all of the pieces are there, but that the pieces in the envelope match the pattern number and size on the envelope. A lot of sewists do mash ups, so I’ve found three or four patterns all in one envelope. This sorting takes time. I watch Netflix while I’m doing it sometimes. The other day, it took me two hours to get through about ten patterns because they were complicated and mashed up. It’s a process.

Once I’ve got the patterns counted and have noted any missing pieces, I take photos. I have a little space set up for this, but also have to have the right lighting. Then I have to edit the photos so they look nice. Old patterns aren’t always the easiest to make pretty, and though I don’t go to the Photoshop extremes that some people do, again, it takes time. Then I post photos to Instagram and Facebook, and try to remember to add them to Pinterest. This requires captioning and hashtags, so again, time.

Then I make the listing, again adding description, title, tags, and the like. I research prices to see what I want to list it at. Then, for history’s sake, I add the pattern to the Vintage Pattern Wiki, because that’s where the archive of patterns is located. I add a link to my shop’s listing there, too, so people can find it. When the pattern sells, I have to go back to the wiki and delete that link. Once I’m done with all of this, I file the pattern away numerically, in one of the pattern cabinets I own. It’s tedious. Filing is not my favorite thing, but it’s better than the old days when I would make the kids do it, and my daughter purposefully misfiled things because she didn’t want to do it.

Of course, when the pattern sells, there are shipping procedures, and a daily run to the post office, but you get my drift: this is work. I love love love what I do, and I’m glad that my customers find me and purchase from me. But it’s work. Are some pattern prices really high? YES. Are some patterns available less expensively somewhere else? Sometimes, but those sellers don’t make any money when you compare to the time they’ve spent.

I’m a professional seller who takes pride in her work, and has to pay her bills. So please people, before you go asking an Etsy seller if they will take less money for their hard work, think it through, because we’re not running a garage sale. We’re conducting business, and business doesn’t work like that. If it does, it won’t be doing it for long.

::end mini rant wrapped up in an informational post::

Uncategorized

Completely Unrelated

This is completely unrelated to vintage fashion or sewing or anything I normally talk about, but as the author of this space, I get to choose, right?

So today, I want to talk to you about My Octopus Teacher, on Netflix. If you haven’t seen it yet, why not? I will admit that I saw it pop up in my suggested viewing and wondered what the heck? A movie about an octopus? Seriously? Well, as you may or may not know, I usually watch something on Prime or Netflix while I’m counting pattern pieces, and I love me a good documentary, so I decided what the heck, I’ll watch it.

WOW.

This movie is SO good. The story is amazing. It’s about healing and our relationship with nature, conservation and yes, an octopus. It’s so moving. Every time you think it’s going to go one way, it surprises you and goes another. It’s simply brilliant, and gorgeously shot. You will probably never look at the ocean the same way, and I’ve always loved the ocean, so that’s really saying something.

And the music. It’s worth it just for the music alone. Kevin Smuts is the composer, and he truly made a gorgeous score. It’s very visual music — you can literally see the water moving when you’re listening, but maybe that’s just me. More on that later, but in the meantime, go watch this movie, then listen to the soundtrack on Spotify. It’s my new go-to work music.

sewing patterns, vintage clothing, vintage fashion

Poor Boy Tops

I listed this pattern the other day. It calls these (very cute) tops “poor boy tops.” I’ve never heard that term before. Apparently it was something that was seen in the 60s and 70s, and was a real thing at the time. Poor boy styles started to be seen at the end of 1961, but didn’t really start taking hold for a few years later. 1961 saw them being sold in combination with “hot dog pants”, which cracked me up. In 1964, they were described as “ribbed, gently shaped pullovers.” The name reported had nothing to do with poverty, but I can’t find a reference to where the term actually originated. The original poor boy tops looked more like a sweatshirt style: looser and very casual, with ribbed cuffs and collar. Keep in mind that the early 60s were a time where it became more acceptable to be seen in public wearing pants, so the style morphed over time to something more fitted and stylish, designed to be tucked in. When they were worn with hip huggers (or low-rise, for the younger set who may not know the hip hugger term), it showed off the detail of the pants, gave a longer look and accented the waist.

Poor boy tops were often knit, but were also seen in cotton, with embellishments like lace. I even found one that was made of wool. Collars could be plain or rolled. They were occasionally cropped length. I found at least one reference to poor boy dresses with dropped waistlines, but have never seen a pattern for one.

. They continued to be seen in fashion over the next few years, and dominated the Fall, 1966 season, and continued to be seen well into the 70s, though not on the top of the fashion heap. By 1976, the style had disappeared — or at least the term had.

Click here to purchase.